Creating a self portrait
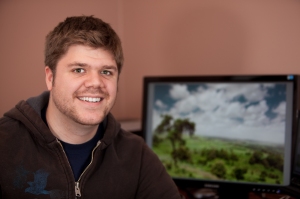
Mapping Across Borders needs a face on it. For better or worse, that’s going to be my face. I wanted to make a headshot portrait where I usually work, doing Africa related stuff. This meant that I would need to be in my office at home, by my computer. To make it look good (from at least a lighting perspective) I would need to set up the light in the room with external camera flashes (like the Canon 580EXII).
Recently, I borrowed a Nikon SB800 flash to experiment with creating multi-flash photos. Problem is, Canon cameras (and flashes) don’t play very nice with Nikon equipment very well. However I knew that by the power of Google, I could surely find a work around. It didn’t take long before I found a Strobist blog post that was able to make the Canon and Nikon systems work perfectly (albeit in manual modes).
Having got the flashes work together, I set out to create a well lit, self portrait. Being new to using multiple flashes, I decided to do what I knew best first and set up the shot normally with one flash pointed directly at me. I composed the shot to include me, and my computer monitor with a photo on it of Ethiopia, simple enough, right?
The hard part about a self portrait is that in order to make it look really nice, you want to have the subject in sharp focus and a pleasant out of focus background. Getting the right parts in focus is pretty easy when making a portrait of somebody else, but when you are doing it all yourself it’s a game of guess and check, making a educated guess, taking a test photo using the count-down timer (or remote if you have one) and then checking the focus on the camera’s LCD screen and guessing at an adjustment. It took a while but eventually I got it close enough that I was happy.
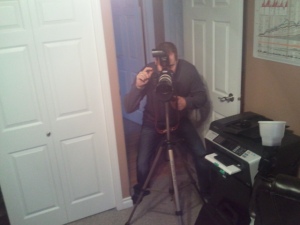
After getting up the composition and focus figured out, I set up the Canon and Nikon flashes. I wanted to make the light look soft and even, while still having directionality as well. To accomplish this, I put the Nikon flash at camera left with a Gary Fong lightsphere attached to it to soften it up for a directional key light.
I then set up my Canon flash to talk with the Nikon, sitting it on top of the camera body. Having the flash on the camera body wasn’t the look I wanted though, so I rotated the direction that the flash pointed to a white door behind the camera. Having the flash point to the door meant that the light would bounce off the door and provide me with a very soft looking fill flash (to get rid of bad looking shadows that the Nikon light cast).

Flash on Camera pointed back at a white door, tupperwear doe on top of the Nikon flash to camera left
Once the lights were set up, I set my camera on to manual exposure, determined the power that each flash would need to be on (by trial and error) and then tried to look pretty. Many shots later, I found one that looked alright and after a few minor changes on my computer I had the final product. What do you think?


